A quality exterior paint job is decided before the first coat of paint reaches the wall. This exterior siding preparation guide explains what needs attention first: dirt, failed caulk, exposed wood, loose paint, moisture damage, and the small defects that can shorten the life of an otherwise good finish.
For homeowners and property managers, preparation is also where a clear scope matters most. Two homes can look similar from the curb but require very different levels of repair. A proper assessment prevents surprise problems, helps set realistic expectations, and gives new paint a sound surface to hold onto.
Why siding preparation matters
Paint is a protective coating, not a repair for damaged siding. It can improve appearance, slow weathering, and help protect surfaces from moisture and sunlight. It cannot bond reliably to peeling paint, chalky residue, mildew, rotted wood, or wet materials.
Skipping prep may save time at the beginning of a project, but it often leads to early peeling, uneven sheen, visible patching, and water getting behind vulnerable areas. In a region with rain, snow, humidity, and temperature swings, those risks are not cosmetic. Moisture that enters through failed caulk or exposed wood can create more extensive repair work later.
The goal is not to make every older exterior look brand new before painting. The goal is to stabilize the surface, correct conditions that will cause paint failure, and create a clean, dry, properly primed base for a durable finish.
Start with a close exterior inspection
Walk around the property in daylight and inspect each elevation, including areas hidden by shrubs, downspouts, porch roofs, and deck railings. Look from a distance first, then get close enough to check joints, trim edges, and the lower courses of siding where splashback is common.
Pay attention to peeling or blistering paint, cracks in boards or panels, open seams, nail pops, warped siding, soft wood, and dark staining. Bubbling paint may signal trapped moisture. Repeated peeling in one location may point to a gutter issue, inadequate flashing, a leaking window, or a surface that was painted before it was fully dry.
Check caulk around windows, doors, corner boards, trim, vents, and other transitions. Caulk that has separated, hardened, cracked, or pulled away should be removed and replaced. Caulk is not meant to fill large gaps caused by missing material or movement. Those areas may need repair or a different solution before sealing.
If wood feels soft when lightly pressed, or if siding has visible rot, painting over it is not the answer. Replace or repair compromised material first. This is one of the most valuable decisions a property owner can make because it protects both the new finish and the structure behind it.
Watch for safety concerns
Homes built before 1978 may have lead-based paint beneath newer layers. Disturbing old coatings through sanding or scraping requires appropriate containment, cleanup, and safe work practices. If there is any concern, stop before creating dust and have the surface assessed by a qualified professional.
Also look for overhead electrical lines, unstable ladders, wasp nests, loose railings, and landscaping that limits safe access. Exterior preparation is detailed work, but it should never be rushed at the expense of safety.
Clean the siding before repairs and paint
Siding collects airborne dirt, pollen, road film, mildew, spiderwebs, and chalking from old paint. A fresh coat applied over that buildup may look acceptable at first, then lose adhesion sooner than expected.
Cleaning methods depend on the siding material and its condition. Vinyl, aluminum, fiber cement, wood, and engineered wood each respond differently to water pressure and cleaning products. High pressure can force water behind siding, damage soft wood, scar older surfaces, or drive moisture into joints. More pressure is not automatically better.
A controlled wash using an appropriate cleaner, light agitation where needed, and a thorough rinse is often the safest approach. Mildew should be treated rather than simply painted over, because staining and growth can return through the coating. Gutters, soffits, fascia, and trim should be included when they are part of the painting scope.
After washing, allow enough drying time. The right wait depends on material, shade, humidity, recent rain, and airflow. Wood siding in a shaded area can take longer to dry than a sun-exposed vinyl wall. Painting damp surfaces traps moisture and is a common cause of premature failure.
Remove loose paint and create a sound edge
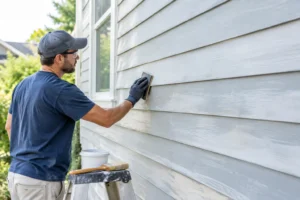
Not every painted exterior needs to be stripped to bare material. Sound, well-adhered paint can often remain in place. The priority is removing loose, flaking, and poorly bonded paint until the remaining coating is stable.
Scraping is usually followed by sanding to soften the edge between bare spots and existing paint. Without that transition, old paint ridges can remain visible after the finish coat dries. Sanding also gives glossy or weathered surfaces enough texture for improved adhesion when the coating system calls for it.
Dust should be removed before primer or paint is applied. On wood siding, exposed end grain and bare areas deserve close attention because they absorb moisture more readily than sealed surfaces. On metal, rust must be removed or stabilized according to the coating system, and bare areas need a compatible primer.
Fiber cement siding has its own considerations. Damaged edges, cracks, and failed joints should be addressed carefully, and manufacturer requirements should guide repair and coating choices. Using the wrong product or excessive pressure during cleaning can affect both appearance and performance.
Repair gaps, defects, and vulnerable areas
Once the surface is clean and loose paint is removed, repairs become easier to see. Fill small holes and minor imperfections with an exterior-rated patching material that matches the substrate. Replace severely damaged boards, trim sections, or siding panels rather than trying to build them back with filler.
Use a paintable exterior sealant where siding and trim meet, around properly prepared window and door trim, and at narrow gaps that need flexibility. Choose a product intended for exterior movement and follow its cure time. Applying paint over uncured caulk can create cracking or discoloration.
This is also the time to correct maintenance issues that can undermine a paint job. Clean clogged gutters, direct downspouts away from the house, trim vegetation back from the siding, and address sprinklers that repeatedly soak one wall. Paint performs best when the property is helping protect it.
Prime only where the surface needs it
Primer is not always a required full-house step, but it is essential in the right places. Bare wood, repaired areas, stained sections, exposed metal, and surfaces with adhesion concerns often need a compatible primer before finish paint. Primer helps seal porous material, improve bonding, and create a more consistent final appearance.
The best primer depends on the substrate and condition. Stain-blocking products may be needed for tannin bleed on certain woods or persistent water stains. Bonding primers can help with difficult, previously coated surfaces. Bare metal may require a rust-inhibitive primer. One product is not right for every exterior.
A professional painting assessment should identify where spot priming is enough and where broader priming makes sense. Applying primer everywhere can be appropriate in some restoration projects, but it adds labor and material cost. Skipping it where it is needed can cost more when paint fails early.
Plan around weather, access, and dry time
Exterior painting depends on weather more than many homeowners realize. Paint manufacturers specify acceptable temperature ranges, surface conditions, humidity limits, and rain-free windows. The air may feel mild while the siding is hot from direct sun, cold from overnight temperatures, or damp from morning dew.
Plan the work in sections and protect landscaping, walkways, windows, fixtures, and outdoor furniture before repairs and painting begin. Move vehicles away from the immediate work zone, and keep pets and children clear of ladders, tools, and wet coatings.
For rental properties or occupied homes, communication matters just as much as preparation. Residents should know when access to windows, decks, driveways, or entry doors may be affected. A well-organized project minimizes disruption while still giving each prep stage the time it needs.
When professional preparation is the practical choice
Some homeowners can handle light washing, simple touch-ups, and minor caulking. A larger project becomes more complex when there is widespread peeling, suspected rot, elevated access, old paint layers, masonry repairs, or ongoing moisture concerns. The visible paint issue may be only part of the problem.
A detailed estimate should explain what will be cleaned, scraped, sanded, repaired, caulked, primed, and painted. It should also clarify what happens if hidden damage is found after preparation begins. Clear upfront pricing and a defined scope make it easier to compare contractors and avoid assumptions.
Qpainting Services approaches exterior work as a surface-protection project, not simply a color change. Careful preparation, organized execution, and a final walkthrough help ensure the finished result looks right and has the best opportunity to last.
Before choosing a paint color, take time to understand what is happening beneath the existing finish. A clean, dry, repaired, and properly primed siding surface gives every coat that follows a better chance to protect your property for years.